Thursday, June 30, 2016

Another round of electrical works

Our electrician came down for another round of works. Now that most of the carpentries are up, he is able to find the center point to fix our lights. Here he is setting up the power points for our automated curtains. I guess to have a smart home, you do need many electrical points, but it would all be worth it in the end!

Introducing the track light in our walk in wardrobe as well as our entrance corridor. It does look good, much better than those downlights, but they are quite expensive itself. A set of tracklights set us back by at least $250. Beauty has its price to pay uh.

Introducing the switches we got for our house. The lights can now be switched on either by just a touch, or through a remote, which eventually will be set to be controlled by our phones itself. Looking forward, we would only need our phones to control every appliances in the house next time. No more numerous remote controls to search through to find the right one.

All the faceplates are installed up too. The one on the right is the network port, which previously was just a telephone port. Easy to connect to the Ethernet through LAN cables now.

This is a glimpse of how we are going to study or do our work next time. Having a good view out of the window, hopefully not distracted. Fixed one of our Eames chair up so that I could sit on it while typing my blog post. Loving it.

With most of the dusty works done and out, it is time to unbox our fridge. This is the Samsung new model which has two cooling fans, one for each compartment. This supposedly keep the food fresher and have less risk of contamination. We got their small model one because it is just the two of us for now, and a smaller fridge means better control over the food stored inside. This mean less chance of having forgotten food and only realizing it after they had expired.

Rubbish. Heaps of it. Waiting for my ID to get someone to clear them. A bit more touch up and some remaining electrical installation, and we are good to move in. Our renovation is coming to an end soon!

Tuesday, June 28, 2016

Default Washing Machine Tap Doesn't Work


The left picture is the default water tap that came with the BTO. The nozzle is different from the usual washing machine tap, which has a larger hole and the screw groove at the side. However, there are many adaptors that are designed for taps like this because most BTO has this as the tap. However, the Samsung model we bought did not have the appropriate adaptor, and we had to either get a new adaptor or change the tap.

As you can see in the right picture, we changed the nozzle of the default tap. Apparently that is possible, so that is one option to consider next time we met with this situation again. The water pipe can now be attached to the tap direct and the problem is solved. Now to the red dot.

The red round object in the middle is a filter-like thing which can be found in the nozzle in the left picture. This is probably a requisite because I believe every taps in all BTOs come with such object so as to save water by reducing the amount of water flowing through. However, this became a nuisance for the washing machine because it likely would not start till the designated amount of water is reached. Hence this would not only not save water, but cause you to wait for 2 hours before the washing actually start. Disclaimer: I have not tried it with that yet, but reading through forums taught me to removed the red dot before connecting the washing machine, and I strongly encouraged you to do the same. You could probably leave the filter-like object in the other taps to really save water though. Save our Earth yeah!

Plumbing Works - Ups and Downs

Lucky number 888! Just happened to saw this before writing my blog so took a screenshot. Not sure how many people are really reading this blog, but hopefully the post here would eventually benefit you all when it is your turn to renovate the house. The best way to learn is not by making mistakes, but by learning from others mistakes.

Installed our black tap. It was so fitting towards our black quartz and sink. Look and feel good. But, it was leaking water. Immediately called the shop up and they arranged a plumber to come down and see the next day. Meanwhile had to close the main water supply else the water is just flowing, and we were afraid it may flow to the cabinets and cause some water damage. Oh bother. Good news is that it was fixed eventually by changing a new one, so case closed.

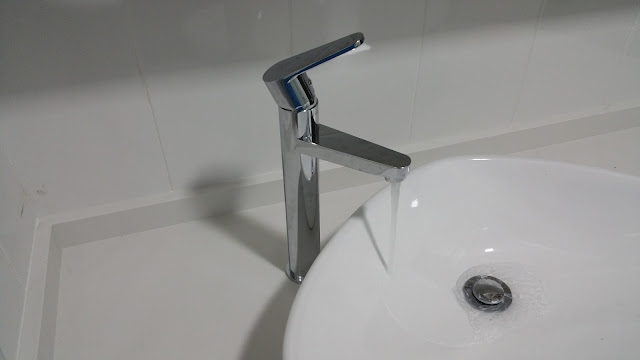
Installed our 'designer' tap and sink too, though we didn't really feel anything special beside the price. The tap was alright, and so were the sink, although we felt that the plumber did not do a good job, and had put too much silicon at the drainer, causing there to have a puddle of water stagnant there always. On top of that, something terrible went wrong here, and it seem that it is too late to be rectified.

As you can see, the tap was installed a little too far away from the sink, resulting in the stream of water near the edge of the sink. It is really tough to wash our hands now, but because the holes were cut into the quartz top already, the position of them are hard to change. Our way out for this is to get another tap that has a longer 'nose' and hopefully solve this issue. The tap should be arriving in a fortnight. Lesson for this is to just have the tap touched the sink during the planning phase. There is really nothing wrong with that, but everything wrong if the tap is too far away.

Monday, June 27, 2016

Quartz looking much better now

Presenting to you how the quartz look like now. This really feel much better now. Am glad that our ID was able to change this willingly. Then again he was the one that felt the other one looked bad, and recommended me this change haha! They also levelled it straight this time so case is declared closed.

Just to show you again how the previous one look like so you don't have to scroll down wondering how it was previously.

A few more looks at our half-wall top. No idea what this should be called, but that's not important. This will be where we put the cooked-ready food to be served to our dining table. I could imagine that aroma that accompany the food already.

Thursday, June 23, 2016

Recommendation - BTO Home Networking

Did you know, that all the telephone ports in the new BTOs are actually wired up with Cat 6 cables? However, they are so underutilized to be used as telephone ports because the Cat 6 cables are actually cables for Gibabit Ethernet, meaning you can actually use them for LAN connection. In layman's terms, it means can plug your computers or routers into the ports to get Ethernet without having to rewire the house up with all the ugly trucking. However, because they are installed with the telephone ports, you would need to change it to a LAN port. You would also need to do some changes to the access ports in the DB box, and that is where BTO Home Networking comes into the picture.

I had tried to get the prices from other people, where I ring up numbers from the leaflets in the lift or recommendations from my estate facebook page. Only after that did I give BTO Home Networking a text, and they beat all the prices quoted hands down. I even managed to get a cheaper rate than usual because they were having a promo of $10 discount for liking one of their associate facebook page. Sure, a like for $10? I'll take it!

The friendly guy came down on the next day (talk about efficiency) and was done in about 30min while having a good chatting session with me. He also labelled the DB box clearly so that we would need to trial and error to find the right ports next time. Anyway the right picture shows is dangling because my electrician have not installed the box for it, so it is left like this. However, I do not have another picture so this is all I got. Of course, such works could actually be DIY, where I am sure there are many guides online to teach you. If you are not as lazy as me, you could give it a go, but should you choose to let the professional handle it, you know who I am recommending.

Definitely recommended 5/5.
Reasonable price and high efficiency
Find them on Facebook.
Tip: look at the other results. Some people may comment on promotions they are having. That was how I saved ourselves $10. :)

Tuesday, June 21, 2016

Carpentry VII - Platform Bed

Our platform bed is up! Love the choice of laminates here. When we first saw it, it looked like unfinished wood for our bedhead. We were almost wondering why did they put the barn frame up without finishing the laminate first. Then we realized that the effect is just like that, and gosh is it unfinishingly beautiful.

Probably the biggest reason for a platform bed is the additional storage space found within in. All around the bed could be opened up to store things which are not commonly used. Our ID had kindly included the hydraulics for us so that the pieces could stay open without us having to hold onto it. However, that caused it to feel like 100x heavier to lift up, and we may resort to disengaging the hydraulics to make it easier to open. Shall see how it goes next time.

Love the green so much! This platform was the largest contributor to us wanting to get the grilles. It was quite dangerous without the grilles as more than half of our body would be above the window. Well, things are much safer now.

And we have finally settled on the trimming for the platform in the living room. We did not want to risk another mismatch so we have went with the safe matte black, which look fitting with the black tv console and black frame of the shoe cabinet. This problem is solved! Much happier with this end result now.

Odd-looking Kitchen Quartz Top

This is how our current kitchen quartz top looked like. Our ID feedback that it looked odd because of the white wall at the right side and there was not a proper transition to it. Hearing that, we took a look ourselves and agreed that it was odd. On top of that, the quartz top for the half wall was actually not levelled, and had coordinated for the contractor to have it changed.

To ensure ourselves that it would not look odd doing the changes, we did some photo editing to see how it would look like. We felt that this would probably look better than the above one. Now lets hope that the right message is conveyed to the contractor and that the end results is like this photo. Now be honest, you thought the photo was a real one and not edited on the first look right?

Saturday, June 18, 2016

Carpentries VI - Shoe Cabinet and Walk In Wardrobe

The end product of our shoe cabinet. Some feedback here is that we felt it was a little too deep for our shoes, perhaps because our shoe sizes are not very big to start with. Shall bring some shoe boxes here next time to see if they fit perfectly, else we would take note of the ideal length instead. Love the huge brown mirror there. It is the cover for our storeroom door, but also for us to check ourselves once more before we step out of the house.

Our walk in wardrobe in the making. Honestly, now that all the pieces are placed together, it does not feel as big and spacious as we imagined it to be. The amount of clothes space also does not really justify the price we had paid too. There will really be a lot of learning pointers on this space, and it had been quite a disappointment, but we shall talk about it after the whole thing is completed.

Much had happened between us and the ID, and we are really just wanting this whole renovation to end quickly. Haven't been the most pleasant experience I must comment, but we shall wait till the renovation is complete, and then we will share more details.

Thursday, June 16, 2016

Carpentries V - Shoe cabinet and Study table

An updated view of the shoe cabinet. Awaiting the glass door before the other doors are installed. Meanwhile, here is a glimpse of my carpenter fixing my study table in the MBR. Hard at work despite it being past 7pm. Good job!

Wednesday, June 15, 2016

Carpentries IV - Massive Work Today

Please rise for the arrival of all my carpentry! It was a rainy weather, and I really hope that none of them were damaged by the rain. Too much horror stories of mold and mushrooms growing in wood pieces had gotten me paranoid over such matters. Hopefully they dries up nicely and last us for the longest time.

But wait... there's more! The amount of carpentry we got for our house is massive. It kinda cost us a hand and a leg but that's the price we are willing to pay to ensure that our first house is exactly how we wanted it to be. We did not want to get things off the shelves because it may not give the sense of together-ness with the other furniture. Hence, everything was designed, customized, and built into our house. If we move house next time, it will be so easy because we could not bring any of them along haha!

Headed up while the carpenter carried every piece up himself. Really have to give it to him, single-handedly doing the entire house carpentry. His works are remarkable and very detailed. From my ID, he is one of the best carpenter, but tend to be slower than the others. Well, I have the luxury of time, and quality over speed, so I am really happy to have him fixing up all my carpentry.

The kitchen quartz top has been installed. Love the starry black quartz although it is not really visible in this picture. However, the higher quartz was not done properly. It was slanted and it looked weird with the middle piece. Some rectification will be taking place here.

We did not really put much effort and thoughts into the planning of the kitchen, but we were really glad it turned out this great. With a kitchen this beautiful, we would definitely spend more time here whipping up a feast or baking some delicious cakes.

Stove is up! I believe it is Fujioh's. We bought these based on the recommendation of our ID and the shopkeeper. Let's hope it lasts! We always feel uncomfortable buying things without reading the reviews, but there are almost no reviews on things like stoves and ovens.

Our black sexy sink! We had opt for the undermount because we felt it is easier to swipe the things on the quartz into the sink this way. There were many comments online recommending overmount instead, including my ID, but we insisted in this. One of the major potential problem is that the water may seep into the wood between the sink and the quartz, and prolong seeping may cost it to rot, destroying the entire kitchen cabinet. However, we weigh the pros and cons and decided it is a risk we are willing to take for the convenience. A better alternative would be to have a cement base for the sink area. That way, you are able to have an undermount sink without fear because there is no contact between the wood and the sink. But it comes at a price.

And eventually everything's moved up from the void deck. And get this! Every carpentry you see in this room, are meant for this room. Without proper arrangement, one probably wonders where do we even put the bed at. So crazy, but so crazily excited how it will turn out.

Oh wait... there's more! Here are all the doors and drawers for the bedroom, in all different height and sizes.

A glimpse on our shoe cabinet and our walk in wardrobe. Stay tune!

Friday, June 10, 2016

Just when you thought it couldn't get worse

We had the platform in the living room and everything was great except the trimming around it. Perhaps it was due to our unique choice of color for the vinyl flooring which is not as simple as light wood or brown wood. However, that is not an excuse we accepted because apparently this was introduced to us as one of the most popular choices among the homeowners. Perhaps all the homeowners were happy with the grey trimming, but definitely not us. To recap, when we first saw it, it looked like a metal construction piece which we mistook as a tool to hold the vinyl flooring in position, like to let the glue stick, but not as a final piece of product.

We told our ID about it, and he got the contractor to deliver some samples down so that we can repick another trimming. On this note, we are really happy how our ID is so accommodating on our changes. Afterall, we want the best look for the house, and if we are dissatisfied with something, it ought to go. The samples came and we picked the bottom middle one because the wood grain were close to our platform and it seemed to match pretty well. So it was decided, and we thought all was well. Nope.

The outcome of our choice was horrible. It was not close to how the sample looked like at all. We almost just called our ID to tell him to just bring back the grey metal construction looking trimming because this was so much worse.

A closer look at the current trimming. We called our ID to express our displeasure with how the actual product was so different from the sample, but he continuously assured us that the trimming was exactly the one we picked. Regardless, we were upset with it, and demanded to change it again. This time round we headed down to their factory to take a look at the big pieces so that hopefully we could pick one that we like and matches. However, there were no ready stock for us to pick from, and we were unwilling to take another chance where we picked the sample and the profile of the trimming came drastically different again. In the end, we decided on a matte black trimming, which would not have any profile issues, and hopefully it matches our tv console and shoe cabinet. Let's cross our finger and hope it goes well this time.

Thursday, June 2, 2016

Carpentries III - Vanity Top and the largest addition

Good morning folks! Little hazy this morning but the view is still a kill to have.

Our oven is in place now. Can't wait to experience the freshly out of oven smell from our cakes and baked delicacies.

Our vanity top in the MBR is done. Have a little curvey style there because of the location of our door. Our toilet is now packed, but nevertheless cosy.

And our largest addition... the SOFA. It was supposed to be here last month, but we slided it back due to the delay in our renovation and carpentries. Much pain if this is dirtied from all the wood-dusts and dirts from the renovation. Had ordered this from JB after we fell in love on first sight. It was much longer in the showroom but we customised for a smaller one in view of our living room space. The picture may not show clearly but this is one deep-ass sofa so that we can always lie in it instead of having to sit up like any ordinary sofas. So much loves.

However we may be having a little issues with this sofa. Noticed the barn design drawers at the right? Hopefully the sofa could fit in the space behind all the way and does not hinder the drawers. Otherwise, we would have two useless drawers. No, the sofa is not going to go. There is too much love for it. The drawers space would have to go instead.